Configure Reverse Lookup zone
We have configured Forward lookup zone. Now we need to create a Reverse lookup zone before we use it.
Do Right click on Reverse Lookup Zones
On welcome screen click on Next

Select the primary zone.
We need not store zone in ADS so Remove the check mark from Store the zone in Active Directory
We need not store zone in ADS so Remove the check mark from Store the zone in Active Directory

Give the network ID from the IP address of the server. Our server IP is 192.168.0.1 so I will set here 192.168.0 [ network partition of IP]

Keep the default name for zone file and click on next

Select Allow both nonsecure and secure dynamic updates. Don't use this option in public network.

On the summary table just click on finish

We have created both zone file for DNS server. Now we need to tell DNS server about our pointer for DNS server.
Expand Reverse Lookup Zones and select 192.168.0.x Subnet [ if you have used different IP for the server then here you will find your IP address's subnet ].
Right click on it and select New pointer

Now give the host ID from IP address. We will give 1 as we are using 192.168.0.1 IP address.

At this point, we have configured both forward and reverse lookup zone. But all these effects will take place after restarting of DNS. DNS service can be restart in two ways either by restarting the service or do a complete restart of the server.
To restart the DNS service Right click on Server and select restart from all task

The configuration of the DNS server can be verified by launching nslookup. To launch nslookup right-click on Server and select nslookup

If you see the default server name in output mean DNS server has been properly configured and functioning. But we haven’t restarted the server so you will not see the server name here.

To apply all these changes Restart the server, After Restart verify it again and you will see the default server name in nslookup

Additional testing of DNS can be done by pinging it by name. Go on any client computer and ping the DNS server. [ Before doing this set preferred DNS IP to 192.168.0.1 other client.]


How To Configure DNS Domain Name System In Server 2003
ADS uses Domain Name System (DNS) to locate resources on a network. Without a reliable DNS infrastructure, domain controllers on your network will not be able to replicate with each other, your clients will not be able to log on to the network, and Microsoft Exchange Server will not be able to send e-mail. Essentially, if your DNS implementation is not stable, your Windows Server 2003 network will fail. This means you must have a thorough knowledge of DNS concepts and the Windows Server 2003 implementation of DNS if you are going to manage a Windows Server 2003 Active Directory environment.
We have installed DNS Server during the ADS configuration wizard. But if you have skipped the configuration of DNS Server at that moment see our previous article to install it from the control panel.
To configure DNS server
Click on start button select administrator tools and click on DNS

If you do not see the DNS option in Administrator tools submenu it means you haven't installed it. See our previous article to installing it.
In left pane expand the Server. Here you can see the default forward and reverse zone which was configured during the ads configuration. Delete the defaults zone files.

Make sure you remove both forward and reverse lookup zone files before start configurations
Now we will create new forward and reverse zone file for DNS.
Right click on forward lookup zone and select new zone files
Click on next on welcome screen

Select the primary zone.
We need not to store zone in ADS so Remove the check mark from Store the zone in Active Directory

Give a relative name for this zone file. For local network we suggest you to give your domain name for this zone file.
Our domain is Example.com so I set Zone name to Example.com
We are creating the first zone So select Create a new file with this file name, do not change default name just click on next

We are going to use this DNS server in local network so select Allow both nonsecure and secure dynamic updates. Don't use this option in public network.

On the summary table just click on finish

DNS Server
Virtually every computer requires a mechanism to resolve the name to IP addresses.
This requirement arises because IP address consists of four groups of number (Version 4, Version 6 consist of 6 groups) and can be difficult for people to remember. People are tending to connect to network services by specifying a name. These names are called hostnames, and each machine is assigned one. Groups of these hosts form a domain. The software that translates these names to network addresses is called the Domain Name System (DNS).
Before Server 2000 NetBIOS (Network Basic Input/Output System) names were used to identify computers, services, and other resources on Windows-based machines. In the early days of Windows networks, LMHOSTS files were used for NetBIOS name resolution.
With Windows 2000 and Windows Server 2003, hostnames are used instead of NetBIOS names. In a Windows Server 2003 domain, DNS is used to resolve hostnames and locate resources such as network services.
To support earlier version in Server 2003 both NetBIOS and DNS coexist. These naming systems are not related with each other so they require separate configuration to resolve their name to IP address.
Earlier versions of the window still rely on NetBIOS names to communicate with other hosts on a network. A NetBIOS name is a 16-character name where the first 15 characters identify a unique host and the 16th character identifies a service or application running on the host such as the Workstation or Server service.
Differences between NetBIOS and DNS
DNS is a naming system that allows people to use names instead of IP address. Names are then translated automatically into IP addresses that computers use to locate each other and to communicate.
NetBIOS is an API (application programming interface) used in earlier version of windows that allow computers to connect and communicate.
NetBIOS use 16-character name while DNS used 255 character names.
NetBIOS use flat name while DNS use the hierarchical name.
· NetBIOS Name:- NetBIOS names are the name which you assign the computer during the installation. NetBIOS computer names are 15 characters, whereas NetBIOS service names are 16 characters. First 15 characters of the NetBIOS service name are the same as the host name. Last sixteenth character is used to identify the specific NetBIOS services.
· Hostname:- First part of FQDN. For example, the first part of the FQDN system1.example.com is system1. The hostname is also known as the computer name.

How to add DNS Server
ADS use DNS to locate the network resources. DNS server would automatically be installed during the installation of ADS. During the installation of ADS, we have the option to skip DNS server. You could install DNS separately if you have skipped this during the ADS installation.
To install DNS separately click on start button and select control panel and click on Add/Remove program

click on Add/remove windows components

Select Networking Services and Click on Details

Tick mark on Domain Name Services and Click on ok

Configuration wizard may ask you to provide I386 folder location
if you are installing DNS first time. I386 folder is located in installation
disk of server 2003.
click on finish to complete the setup process
BASIC WORKGROUP NETWORKING
Workgroup networking is the essence of computer networking. In this section, we have prepared a step by step practical guide for workgroup networking. We have prepared this guide in a lab environment but you could use it in real life as well. You could use this guide for home networking, cyber café networking, in small office networking. We have added some real-life troubleshooting tips to make it more use useful for practical life. I hope you would found this guide helpful for setting up a workgroup network.
How to configure a peer to peer workgroup network step by step Guide
Workgroup networking is the most essentials part of computer networking. From our tutorials on workgroup networking in this article, we would set up a practice workgroup network in a lab environment. For this practice, you need 4 computers, internet connection, printer and installation media of XP professional and Vista. You could use Vmware or any other virtual pc software to simulate the computers if you are doing this practice on a single pc. I personally prefer Vmware.
If you are setting up this network in real life environments like cyber café or any small office consider the following approach before taking any final decision on a workgroup network
- · Determine your requirements
- · Choose between wired and wireless media
- · Map your physical network
- · Map your logical network
- · Create a utilization plan
I assume that you have gone through these steps and come up with a plan to use 4 computers with star topology for this network.
|
Computers
|
4 With any descriptive Name
|
|
Operating system
|
windows XP professional and vista
|
|
Topology
|
Star
|
|
Printer
|
One
|
|
Modem
|
One
|
|
Workgroup Name
|
SOFTWARE
|
Now it's time to implement our workgroup network
Install XP professional on three systems and Vista on one system.
During the installation process, computer and workgroup name are automatically generated. You could use these names but it would be better to have a good and descriptive name. To change computer and workgroup name Right-click on My Computer and select Properties, or open the System applet from Control Panel.

Select the Computer Name tab ==> click Change to open the Computer Name Changes dialogue box.

Follow this guideline while choosing a name for computer and workgroup
· Computer name should be unique in a workgroup.
· Workgroup name should be the same for all computer.
· Workgroup name may be up to 15 characters long and may contain any alphanumeric (a-z and 0-9) characters, as well as special characters except for ; : " < > * + = \ | ?.
· Computer name can be up to 15 characters long and have the same naming restrictions as a workgroup. In addition, the computer name cannot be the same as the workgroup name.
Enter a new computer name in the Computer Name field and new workgroup name in Workgroup field and click OK.

You will be prompted to restart your computer to complete the name change. Click yes to restart your computer.

We have completed our first necessary step. Now its time to configure LAN card.
Configure LAN card
First check LAN card driver
Right Click on My Computer ==> properties ==> Hardware ==> Device manager ==> Network Adaptor ==> Check here (also check under the other devices tag)
Situation:- Showing
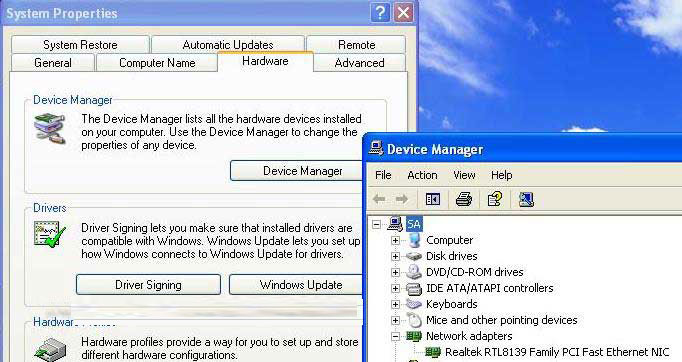
Description:- Installed and working properly
Situation:-Showing with Yellow sign

Description:- LAN card driver is corrupted
Solution:- Install LAN card driver.
Situation:- Showing with Red Cross
Description:- Either cable is unplugged or LAN card is disabled
Solution:- My network places ==> properties ==> local area connection ==> right click ==> Enable (Follow only if Lan card is disable )
Check whether network cable is plugged or not
Description:- Either cable is unplugged or LAN card is disabled
Solution:- My network places ==> properties ==> local area connection ==> right click ==> Enable (Follow only if Lan card is disable )
Check whether network cable is plugged or not
Situation:-Not Showing

Description:- LAN card is not detected yet (Check for physical installation)
Solution:- Open the cabinet and check for physical detection
Check Bios ==> On bord Lan Option should be enable
Solution:- Open the cabinet and check for physical detection
Check Bios ==> On bord Lan Option should be enable
Checking LAN card in Network place
How to show my network place on Desktop?
Right click on the free space of desktop ==>Customize desktop ==>check mark on My network places ==> Apply ==> Ok
Right click on the free space of desktop ==>Customize desktop ==>check mark on My network places ==> Apply ==> Ok
My network place ==> properties ==>local area connection
Situation:- Showing
Situation:- Showing
Description:- Installed and working properly
Situation:-Showing with Red Cross

Description:-cable is unplugged
Solution:-Check whether network cable is plugged or not
Solution:-Check whether network cable is plugged or not
Situation:-Showing with Yellow sign
Description:-LAN is working on Automatic private IP.
Solution:- assign manually IP address
Description:-LAN is working on Automatic private IP.
Solution:- assign manually IP address
Situation:-Showing with disabling

Description:-LAN is disabled
Solution:-My network places ==> Local area connection ==> Right click ==> Enable (Follow only if Lan card is disable )
Situation:-Showing

Description:-LAN is firewall protected
Solution:-There is no need to on firewall unless you are connecting with internet.
To turn off firewall
My network place ==> properties ==>local area connection ==> properties ==>Aadvanced ==>Settings
To turn off firewall
My network place ==> properties ==>local area connection ==> properties ==>Aadvanced ==>Settings

Genral==> Off

Next step is to check 4 necessary configurations in LAN card properties
· LAN cards drives
· Client for Microsoft network
· File and printer sharing services
· Internet protocols (TCP/IP)

If you don't find any of these here and then install that by using install button before going further Once you have completed these steps then go to our next article
