BASIC WORKGROUP NETWORKING
Workgroup networking is the essence of computer networking. In this section, we have prepared a step by step practical guide for workgroup networking. We have prepared this guide in a lab environment but you could use it in real life as well. You could use this guide for home networking, cyber café networking, in small office networking. We have added some real-life troubleshooting tips to make it more use useful for practical life. I hope you would found this guide helpful for setting up a workgroup network.
How to configure a peer to peer workgroup network step by step Guide
Workgroup networking is the most essentials part of computer networking. From our tutorials on workgroup networking in this article, we would set up a practice workgroup network in a lab environment. For this practice, you need 4 computers, internet connection, printer and installation media of XP professional and Vista. You could use Vmware or any other virtual pc software to simulate the computers if you are doing this practice on a single pc. I personally prefer Vmware.
If you are setting up this network in real life environments like cyber café or any small office consider the following approach before taking any final decision on a workgroup network
- · Determine your requirements
- · Choose between wired and wireless media
- · Map your physical network
- · Map your logical network
- · Create a utilization plan
I assume that you have gone through these steps and come up with a plan to use 4 computers with star topology for this network.
|
Computers
|
4 With any descriptive Name
|
|
Operating system
|
windows XP professional and vista
|
|
Topology
|
Star
|
|
Printer
|
One
|
|
Modem
|
One
|
|
Workgroup Name
|
SOFTWARE
|
Now it's time to implement our workgroup network
Install XP professional on three systems and Vista on one system.
During the installation process, computer and workgroup name are automatically generated. You could use these names but it would be better to have a good and descriptive name. To change computer and workgroup name Right-click on My Computer and select Properties, or open the System applet from Control Panel.
Select the Computer Name tab ==> click Change to open the Computer Name Changes dialogue box.
Follow this guideline while choosing a name for computer and workgroup
· Computer name should be unique in a workgroup.
· Workgroup name should be the same for all computer.
· Workgroup name may be up to 15 characters long and may contain any alphanumeric (a-z and 0-9) characters, as well as special characters except for ; : " < > * + = \ | ?.
· Computer name can be up to 15 characters long and have the same naming restrictions as a workgroup. In addition, the computer name cannot be the same as the workgroup name.
Enter a new computer name in the Computer Name field and new workgroup name in Workgroup field and click OK.
You will be prompted to restart your computer to complete the name change. Click yes to restart your computer.
We have completed our first necessary step. Now its time to configure LAN card.
Configure LAN card
First check LAN card driver
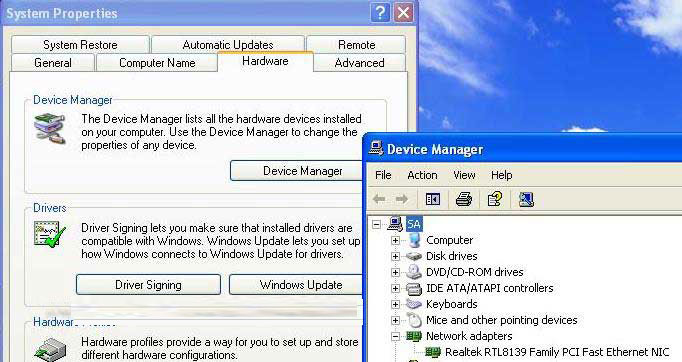
Right Click on My Computer ==> properties ==> Hardware ==> Device manager ==> Network Adaptor ==> Check here (also check under the other devices tag)
Situation:- Showing
Description:- Installed and working properly
Situation:-Showing with Yellow sign
Description:- LAN card driver is corrupted
Solution:- Install LAN card driver.
Situation:- Showing with Red Cross
Description:- Either cable is unplugged or LAN card is disabled
Solution:- My network places ==> properties ==> local area connection ==> right click ==> Enable (Follow only if Lan card is disable )
Check whether network cable is plugged or not
Description:- Either cable is unplugged or LAN card is disabled
Solution:- My network places ==> properties ==> local area connection ==> right click ==> Enable (Follow only if Lan card is disable )
Check whether network cable is plugged or not
Situation:-Not Showing
Description:- LAN card is not detected yet (Check for physical installation)
Solution:- Open the cabinet and check for physical detection
Check Bios ==> On bord Lan Option should be enable
Solution:- Open the cabinet and check for physical detection
Check Bios ==> On bord Lan Option should be enable
Checking LAN card in Network place
How to show my network place on Desktop?
Right click on the free space of desktop ==>Customize desktop ==>check mark on My network places ==> Apply ==> Ok
Right click on the free space of desktop ==>Customize desktop ==>check mark on My network places ==> Apply ==> Ok
My network place ==> properties ==>local area connection
Situation:- Showing
Situation:- Showing
Description:- Installed and working properly
Situation:-Showing with Red Cross
Description:-cable is unplugged
Solution:-Check whether network cable is plugged or not
Solution:-Check whether network cable is plugged or not
Situation:-Showing with Yellow sign
Description:-LAN is working on Automatic private IP.
Solution:- assign manually IP address
Description:-LAN is working on Automatic private IP.
Solution:- assign manually IP address
Situation:-Showing with disabling
Description:-LAN is disabled
Solution:-My network places ==> Local area connection ==> Right click ==> Enable (Follow only if Lan card is disable )
Situation:-Showing
Description:-LAN is firewall protected
Solution:-There is no need to on firewall unless you are connecting with internet.
To turn off firewall
My network place ==> properties ==>local area connection ==> properties ==>Aadvanced ==>Settings
To turn off firewall
My network place ==> properties ==>local area connection ==> properties ==>Aadvanced ==>Settings
Genral==> Off
Next step is to check 4 necessary configurations in LAN card properties
· LAN cards drives
· Client for Microsoft network
· File and printer sharing services
· Internet protocols (TCP/IP)
If you don't find any of these here and then install that by using install button before going further Once you have completed these steps then go to our next article


No comments: